Tạo widget dạng tab nằm ở sidebar hoàn toàn bằng CSS
Khôi Ròm - tháng 7 05, 2018 -
Blogspot, CSS, Thủ thuật blogspot
Mình là người rất thích sự nhẹ nhàng, các bạn có thể thấy template của mình làm hoàn toàn từ CSS, trừ việc chèn comment facebook và double click ra thôi hihi.
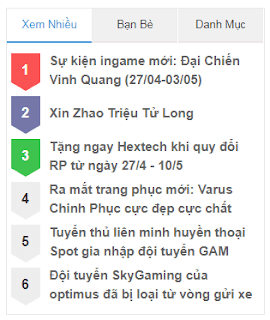
Và ngày hôm nay, mình sẽ chia sẻ cho các bạn 1 thủ thuật rất hay, đó là tạo widget dạng tab nằm ở sidebar hoàn toàn bằng CSS nhé, ko có javascript đâu, mà nó còn đẹp hơn cả thủ thuật tạo ra bằng javascript nữa.
Các bạn có thể xem demo tại đây
Cách thực hiện
Bước 1: Truy cập blogger.com > chủ đề > chỉnh sửa htmlTìm đến đoạn
<div id='sidebar'>hoặc
<div class='sidebar'>hoặc
<div class='sidebar-wrapper'>... tùy theo mỗi template, nếu bạn không tìm được hãy comment bên dưới mình sẽ trợ giúp.
Bước 2: Dán hết đoạn code này ngay bên dưới sidebar bạn vừa tìm được
<style>
.ease { -webkit-transition:all .5s; -moz-transition:all .5s; -o-transition:all .5s; transition:all .5s; }
.tabcss { width:100%; margin:0 auto; }
.tabs { background:#fff; position:relative; }
.tabs > input,.tabs > span { width:33.33%; height:38px; line-height:38px; position:absolute; top:0;border-bottom:2px solid #ede8e8}
.tabs > input { cursor:pointer; filter:alpha(opacity=0); opacity:0; position:absolute; z-index:99; }
.tabs > span { background:#f0f0f0; text-align:center; overflow:hidden; }
.tabs > span i,.tabs > span { -webkit-transition:all .5s; -moz-transition:all .5s; -o-transition:all .5s; transition:all .5s; }
.tabs > input:hover + span { background:rgba(255,255,255,.1); }
.tabs > input:checked + span { background:#fff; }
.tabs > input:check + span { border:1px solid #000; }
.tabs > input:checked + span,.tabs > input:hover + span { color:#3498DB; }
#tab-1,#tab-1 + span { left:0; }
#tab-2,#tab-2 + span { left:33.33%; }
#tab-3,#tab-3 + span { left:66.67%; }
.tab-content { padding:45px 0 0; width:100%; min-height:310px; }
.tab-content section { width:100%; display:none; }
.tab-content section h1 { margin-top:15px; font-size:100px; font-weight:100; text-align:center; }
#tab-1:checked ~ .tab-content #tab-item-1 { display:block; }
#tab-2:checked ~ .tab-content #tab-item-2 { display:block; }
#tab-3:checked ~ .tab-content #tab-item-3 { display:block; }
.effect .line { background:#3498DB; width:33.33%; height:2px; position:absolute; top:38px; }
#tab-1:checked ~ .line { left:0; }
#tab-2:checked ~ .line { left:33.33%; }
#tab-3:checked ~ .line { left:66.67%; }
.sidebarpro{width:100%}
</style>
<div style='width:100%;height:356px;border:1px solid #ede8e8;margin:5px 0 12px;overflow:hidden'>
<div class='tabcss'>
<div class='tabs effect'>
<input checked='checked' id='tab-1' name='tab' type='radio'/> <span href='#tab-item-1'>Xem Nhiều</span>
<input id='tab-2' name='tab' type='radio'/> <span href='#tab-item-2'>Bạn Bè</span>
<input id='tab-3' name='tab' type='radio'/> <span href='#tab-item-3'>Danh Mục</span>
<div class='line ease'/>
<div class='tab-content'>
  <section id='tab-item-1'><b:section class='sidebarpro' id='tab1' maxwidgets='1' preferred='yes' showaddelement='yes'></section>
  <section id='tab-item-2'><b:section class='sidebarpro' id='tab2' maxwidgets='1' preferred='yes' showaddelement='yes'></section>
  <section id='tab-item-2'><b:section class='sidebarpro' id='tab2' maxwidgets='1' preferred='yes' showaddelement='yes'></section>
</div> </div> </div> </div>
Tùy chỉnh lại, sau đó lưu. Tiếp theo vào trong bố cục sẽ thấy xuất hiện 3 ô widget, hãy tự tùy chỉnh cho riêng mình nhé.
Tổng kết
Chỉ với đoạn css và html nhỏ, chúng ta đã tạo ra đc widget tab rồi. Chúc các bạn thành công. Nếu không thực hiện được hãy comment bên dưới nhé.

